Everything You Need to Know About Video
Panopto, CCA's fully-featured video platform, is here! See the Panopto page in Portal for more details on its usage. This page mostly discusses other video technologies.
Help on all things videos for instructors at CCA. Don't see the answer you're looking for? Contact the Help Desk!
- Creating Videos to Share with Students
- Captions
- Video in Moodle
- Video File Size
Using Zoom to Create Videos
Zoom is not only a video conferencing tool, it can also make recordings. Essentially, you create an empty meeting, then record yourself talking while displaying slides and media.
- Open the Zoom app (if you don't have it, download Zoom here)
- If you're not logged in, you will be prompted to (see Signing Back In on the Zoom help page)
- Select New Meeting to immediately start an empty meeting with only yourself in it
- Unmute yourself and Start Video with the two buttons in the bottom control panel
- You can now use the Record button to begin recording and there are two options:
- Record to the Cloud stores the recording on Zoom's servers and creates a transcript automatically, so we recommend this
- Record on this Computer saves the file locally on your hard drive, which can be useful if you plan to add your own captions or for very long recordings
- During recording, use Share Screen to show something other than your web cam's view
- When you're done recording, use the square "stop" button or go to Meeting > Stop Recording in the menu bar. You can also simply End the meeting to stop recording.
- The video will be available after it finishes processing
If you chose to record to the cloud, you will receive an email when the video is ready and a second email when the transcript is ready. You can share a link directly to the Zoom website with your students, or download the video to post it somewhere else, like Moodle or VoiceThread. You have limited (1GB) space on the Zoom cloud so we recommend posting the video elsewhere once the automated captions are complete.
If you recorded locally, Zoom will open the folder containing the video files. In both cases, cloud or local, Zoom creates several files for each recording: an mp4 video file, an m4a audio-only file, and a chat transcript text file if anything was written into chat. If you press stop during a meeting, then record again, Zoom creates a series of sets of these files.
Do you have more Zoom questions? Visit the Zoom page on the Portal or view our Introduction to Zoom for Faculty video.
Using VoiceThread to Create Videos
- First, login to VoiceThread by selecting Sign In and entering your CCA credentials at the familiar login page
- Select Create to make a new VoiceThread then Add Media and select Webcam Video if you want both your camera and audio to record (you could also choose audio-only or take a picture using your camera at this stage)
- VoiceThread may ask for permission to use your microphone and camera, if you haven't already given permission
- After a four-second countdown, recording starts. When you're done, select Stop Recording. You can use Record More to add onto your video
- Save when you're done and add a title and description to your thread
- You can now use the Share menu to distribute to your students
This is a basic use of VoiceThread—you can add various media or other video recordings to a thread, then add text, video, or audio comments on top of those. See the Creating section of VoiceThread's help documentation or the VoiceThread page on Portal for more on its capabilities.
Recording Spaces for Faculty
Faculty should have received an email on July 31st entitled "Faculty Campus Access for Audio/Video Recording and Scheduling Process" which details how spaces for recording videos will be provided on campus. The documentation for access to campus recording spaces is on the COVID-19 page for faculty along with links to the form to reserve rooms and to contact Media Services about obtaining equipment.
Adding Automatic Captions in Panopto
Using YouTube to Automatically Generate Closed Captions
YouTube can be used as a tool to automatically generate closed captions for your video content, such as a lecture or recorded class discussion, even if you are going to share the video outside of YouTube, such as uploading to Moodle or VoiceThread.
Uploading to YouTube
- Sign in to YouTube using your CCA account.
- Click the “Create” icon on the top right (image of a video camera with a plus symbol).
- Choose “Upload Video.”
- Click “Select files” or drag-and-drop your video to upload.
- Details menu: While your video upload is processing, the “Details” menu will open.
- Title your video.
- Add a description.
- Declare whether or not the video is made for kids (this is required).
- Click “Next.”
- Video elements menu: just click “Next.”
- Visibility menu: YouTube will automatically generate captions whether the video is private, unlisted, or public. Choose which option is most appropriate for your intended use of the video.
- Click “Save.”
- The captions will not be immediately available. Depending on the size and length of your video file, it will take time for YouTube to transcribe your video. You can close your browser and come back later.
Editing your captions
Automatically generated captions will always contain errors: incorrectly transcribed words, inclusions of “um” and “uh,” and uncapitalized words that should be capitalized. If you would like to edit your captions, follow these steps.
- To return to the video you have uploaded, go to studio.youtube.com.
- Click the “Videos” icon on the left side navigation bar.
- Click the thumbnail for the video you want to edit the captions of.
- Click the “Subtitles” icon on the left side navigation bar.
- On the Video Subtitles page, you will see a list with columns for “Language,” “Modified on,” “Title & description,” and “Subtitles.” If your automatically generated captions are ready, there will be a listing described as “English (Automatic).” These are your automatically generated closed captions. If this entry does not appear, YouTube has not finished automatically transcribing your video, and you should return later.
- Hover over the entry for “English (Automatic).” Three vertical dots will appear adjacent to the “Subtitles” column.
- Click the three vertical dots and select “Edit on Classic Studio.”
- Click “Edit” on the top right.
- Edit your captions to your satisfaction. Your video will play back in snippets while you are editing if you need to relisten to portions of your video to ensure the captions are correct.
- When you are done editing, click “Publish edits” on the top right.
- Return to the Video subtitles menu (see steps 2-5). You should see an additional language entry: “English”, “Published by Creator.” This is your edited caption file.
- To download the caption file to pair with the video in Moodle or VoiceThread, continue to the “Downloading a captions file from YouTube” instructions below. (If you are already on the Video subtitles menu, you can skip steps 1-5.)
Downloading a captions file from YouTube
- To return to the video you have uploaded, go to studio.youtube.com.
- Click the “Videos” icon on the left side navigation bar.
- Click the thumbnail for the video you want to edit the captions of.
- Click the “Subtitles” icon on the left side navigation bar.
- On the Video Subtitles page, you will see a list with columns for “Language,” “Modified on,” “Title & description,” and “Subtitles.”
- If your automatically generated captions are ready, there will be a listing described as “English (Automatic).” These are your automatically generated closed captions. If this entry does not appear, YouTube has not finished automatically transcribing your video, and you should return later. If you would like to edit these captions, see the instructions for “Editing your captions” listed above, and skip steps 1-5.
- If you have edited your automatically generated captions, you will see an entry listed as “English”, “Published by Creator.”
- Hover over the entry for the captions you want to download. Three vertical dots will appear adjacent to the “Subtitles” column.
- If you are going to upload the captions file to VoiceThread, go to step 7.
- If you are going to upload the captions file to Moodle, go to step 9.
- VoiceThread: Select “Download.” Your captions file will download to your computer in a format accepted by VoiceThread.
- Here are instructions on how to upload this captions file to VoiceThread.
- Moodle: Select “Edit on Classic Studio.”
- In the “Classic Studio,” click “Actions” and select “.vtt” listed under Download. This is the only caption file format accepted by Moodle.
- We have further instructions on how to upload this captions file to Moodle.
Adding Captions to Google Slides
Watch this video to see how to add captions to your presentation in Google Slides. Remember that it is OK to use Google Slides during a Zoom call or as part of a recording; while students cannot access the slides, they will be able to access Zoom or your recording.
- Create your slide presentation and enter Present mode
- Click on the "CC" closed caption icon
- Done! You can do this while recording a Zoom and the captions will be recorded
Adding Captions to Your Video in VoiceThread
These instructions utilize YouTube simple for the sake of creating the automatic captions for your video. You can use your CCA Google Apps account to access YouTube.
- Create your video using whatever recording software you prefer, for instance using Zoom or using VoiceThread
- Use the steps we've described to retrieve your captions from YouTube
- Create a VoiceThread with your media
- In the upper right corner, locate the Closed Captioning (CC) icon.
- Click on the button and choose “Add captions.”
- Select your caption file. VoiceThread accepts caption files in these formats: DFXP, SRT, SAMI, SCC, and SBV.
Adding a Closed Captions File to Moodle
Combining a few techniques described elsewhere on this page, we can create a video, upload it to YouTube to create and refine its captions, then download and re-upload to Moodle to share with students. The key thing to remember is to download the VTT captions format from YouTube, as that is the only one which Moodle accepts.
- Use the “Insert or edit an audio/media file” button in a rich text editor box. (here are more detailed instructions on uploading videos to Moodle)
- After uploading the video file, open the “Subtitles and Captions” menu.
- Click the “Captions” tab in the menu.
- Click “Browse Repositories” to upload your closed captions file. Note: Moodle will only accept captions in the .vtt file format. Please see our “Downloading a captions file from YouTube” instructions for how to obtain the .vtt file.
- After uploading the .vtt file, click “Insert Media.”
- Your video, with its attached caption file, should now be available in the rich text editor.
- Make sure to click “Save and Return to Course” or “Save and Display.”
- Students viewing the embedded video will be able to toggle the captions on or off.
Video in Moodle
There are a few ways to add videos to Moodle, each with its own advantages and disadvantages. Moodle supports virtually every major video format (.mov, .mp4, .m4v, .ogv, .webm). There is a 250 MB limit on file size and uploads will progress quite slowly. We recommend that you host large video files elsewhere, if feasible.
Moodle's official video documentation may help answering some questions not covered here.
Embedding a VoiceThread in Moodle
VoiceThread can be embedded directly into Moodle. A VoiceThread embedded in Moodle is interactive: participants can add comments or interact with the VoiceThread without having to leave Moodle or signing in elsewhere. Follow these instructions to embed a VoiceThread into your Moodle course.
- Click on the Share button for the VoiceThread you want to embed in Moodle.
- Select “Basic” on the tabbed Share menu.
- Choose “Embed” from the left side menu.
- Click the large blue “Copy Embed Code” button. You should see a green popup message that says “Copied to Clipboard.”
- Log onto your Moodle course.
- Decide where you want to embed your VoiceThread. You can embed your VoiceThread within virtually any type of activity or resource.
- If you want to embed your VoiceThread within an existing activity or resource, select “Edit Settings” for the chosen activity or resource.
- If you want to embed your VoiceThread in a new activity or resource, click “Add an activity or resource” and make a selection, such as “Assignment,” “Forum,” or “Page.”
- If you want to embed your VoiceThread on the main course page, click “Add an activity or resource” under the appropriate section and choose “Label” (under Resources).
- In the rich text editor, click the HTML toggle button (</> symbol). Note: There will be existing text (<p><br></p>) that you can ignore.
- Paste in the embed code you copied on VoiceThread.
- Click the HTML toggle button. You should now see the VoiceThread in the rich text editor. You can add text or other media above or below the VoiceThread.
- When you are done adding additional information or changing settings, make sure to click “Save and Return to Course” or “Save and Display.”
Recording a Short Video in Moodle
You can record your own video directly into a Moodle rich text area. If you select the Record Video button in the rich text editor, give Moodle permission to use your computer's web camera and microphone, you can record up to two minutes of video. You are given a chance to review the video before "attaching" it to the text area.
Recording directly in Moodle is practical for quick comments or feedback—for instance, you could direct students to record a short introduction in a forum—but it is very limited in that you will not be able to record your screen, only your face. If you want to record video longer than two minutes or utilize your screen, look into using Zoom, Panopto, or VoiceThread.
Embedding External Videos (YouTube, Vimeo) in Moodle
Remember that YouTube & Vimeo are not accessible in China and so should be avoided if possible.
If you simply paste a link to a YouTube or Vimeo video into Moodle's text editor, it is automatically converted into an embedded video player. It's incredibly easy and quick but does not give you any control over the appearance of the embedded player. Also, note that this happens automatically and cannot be easily controlled, so any time you link to a YouTube or Vimeo video it will magically turn into an embedded video player whether you want that or not.
A second option, which works not only for major platforms like YouTube but any video host which provides an embed code, is to insert the embed code into the HTML source code of a text area. To do so, copy the embed code to your clipboard, edit the text area in Moodle, use the HTML button (it's icon is "</>"). Paste the code into the HTML at the desired point; you may need to read through the HTML to determine where that is. The advantage of this approach is that you can use whatever features YouTube, Vimeo, or another video player affords you—for instance, Vimeo lets you autoplay or loop an embedded video. You can also resize a video via its embed code, as described in the next section.
Resizing Videos in Moodle
In general, it is not valuable to spend much time resizing video content. Remember that, while you might create and view your content exclusively on a laptop or desktop computer, your students view things on a variety of devices, including tablets and smartphones with small screens. There is no guarantee that videos are presented the way you painstakingly format them. Instead, focus on video content that is device agnostic and viewable at any size.
For video files:
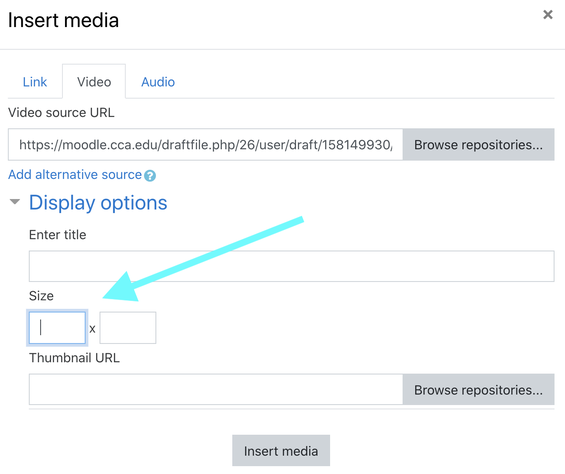
- Add your video to a text area by select the "Insert or edit an audio/video file" button in the rich text editor (it's icon is a video camera on a page)
- Select the Video tab, then the gray Browse Repositories button
- You can Upload a file or locate a file in another repository (your recent files, Google Drive), then Select this file on the next dialog page
- Once your video is uploaded and selected, note the collapsed Display options settings: expand these to specify the video's dimensions in the two inputs labelled Size
- When done, Insert Media to embed the video in the text area. You can always return to these settings by selecting the video within the text area and using the "audio/video" button again
For linked video files:
- Is your video file hosted outside Moodle? You can select the video camera icon ("Insert or edit an audio/video file" button in the rich text editor) to add a video as "Link" to a common video format, like .mp4 or .mov
- At the end of the video's URLs, specify the display dimensions by appending a question mark, then the letter "d", then an equals sign "=", followed by the numeric width in pixels, a lower case "x", and finally the height in pixels:
- For instance, a URL ending in movie.mp4?d=720x480 would embed the "movie.mp4" file in a box 720 pixels wide and 480 pixels tall
- Note that you can warp the aspect ratio of your video by specifying dimensions that do not align with the original ones; use an aspect ratio calculator to ensure that the ratio between width and height of your resized video is retained
For videos added as File resources:
Videos added as File resources cannot be resized. These videos either download or open in a new window, depending on several factors such as the device and web browser being used. If you choose to add a video by selecting Add an activity or resource and choosing File from the list of options, you are ceding all control over how that video is displayed. We do not recommend adding videos as File resources.
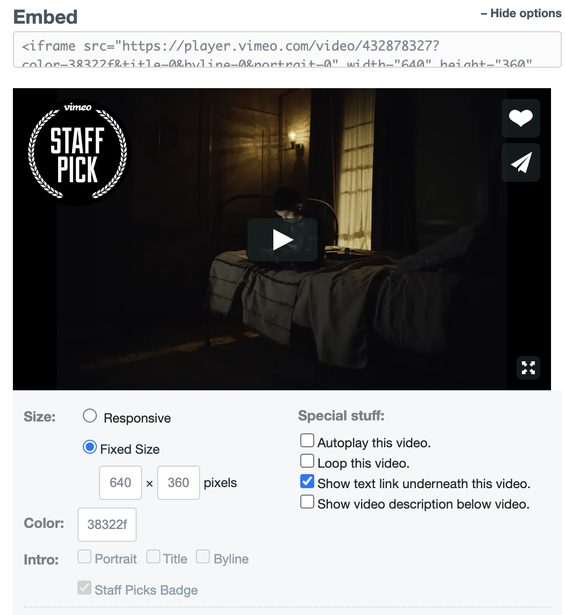
For embedded videos (e.g. from Vimeo, YouTube, or similar):
A URL from Vimeo or YouTube pasted into one of Moodle's text areas will turn automatically into an embedded video player. There is no way to alter the dimensions of these automatically created embedded videos, but there is an alternative, more complex method of embedding videos from third-party services that provide embed codes.
- Find the HTML "embed code" for the externally hosted video, for instance as part of a Share menu:
- YouTube shows the code under Share > Embed
- Vimeo also shows the code under Share > Embed
- Copy the entire HTML, which most likely begins like "<iframe", to your clipboard, then visit Moodle and find the text area where you want to embed the video
- Edit the text area and use the HTML button (its icon looks like "</>") of the rich text editor to view the source code of the text area. There will already be content in the text area even if it appears empty to you—attempt to find where you want the embed to appear (you can test out different positions until you find a desirable one)
- Paste your embed code into the text area
- In the embed code, locate the "height" and "width" attributes that define the size of the video player
- For instance, the width and height are bolded in this example code: "<iframe width="560" height="315" src="https://example.com/embed/abcd1234" frameborder="0" allow="autoplay; picture-in-picture" allowfullscreen></iframe>"
- Remember to retain the aspect ratio of the video player—use an aspect ratio calculator to keep the height/width proportionate to the original
Video Size Restrictions
Different video platforms have different file size limitations, which may change over time, too. We will keep this section updated.
- Panopto — unlimited! You can store as many videos that are as long as you like. We recommend Panopto for this reason.
- Zoom - in your cloud recordings you can store up to 1GB of video, but when recording to your computer the only limit is free hard drive space
- Moodle - 250 MB but note that uploads go slowly; you can watch their progress in the gray bar in the lower left corner of your web browser
- VoiceThread - 3GB limit (but ensure that you are signed in via your CCA account)
- VAULT - technically VAULT has no file limit, but uploads that take a while can time out and be cancelled, wasting a lot of time. We recommend a 5GB limit as a guideline
- YouTube - functionally no limit, but remember that YouTube is inaccessible in China
Is your video too large for your chosen platform? In the next section, we describe the best techniques for reducing video file size.
How can I reduce my video's file size?
Many video creation programs do not focus on limiting file size because they want to record full fidelity video, leaving the option of optimizing the file later up to you. We recommend you employ one or more of these file size reduction techniques before uploading your video to one of CCA's learning platforms. It will not only save you a lot of time waiting for the upload to complete, but then save all your students collectively additional time spent downloading the video (remember that some students may not have broadband internet access), and finally it will reduce the file storage strain CCA's systems which gives us more resources to devote to assisting you. It is worth noting that Panopto has no file storage limit, however.
Trim your video. Don't let wasted time at the start or end of a video increase its size, use a video editor to "trim" off unneeded content. Every major video editor has an easy means of doing this. In the default Mac OS video software, QuickTime Player has a Trim command with keyboard shortcut Command + T. For Panopto, see How to Trim a Video in the Editor.
Split up content. If you're recording a long lecture, find stopping points to split it up into smaller concepts. Most pedagogical research recommends you limit your videos to six minutes or less. While that can be challenging, it will be effective. There is an inverse correlation between the length of a video and student engagement—the longer a video is, the less students consume and comprehend it.
Export a compressed or lower quality video. You can often choose an option related to compression or video size when exporting or processing your video. For instance, try exporting in 720p instead of 1080p to greatly reduce file size. Software like VLC or Handbrake let you choose from even more export options. This article on video export/conversion explains a few ways to reduce your file sizes.