Course Section Pages in the Portal for Faculty
Portal section pages connect your students (and you) to course information pulled in from CCA's systems of record and important class resources hosted elsewhere. Watch our overview video or read about a topic linked from the index below.
What are these Portal course section pages?
Course section pages show useful info from Workday
Each course section you teach has its own course section page on Portal, based primarily on data pulled in from Workday, CCA's academic system of record.
Course section pages can link to important content
You can customize these course section pages with linked content:
- Linking to class sites (like Google Classroom or Moodle)
- Uploading your syllabus
- Linking to additional online resources
- Displaying a Google calendar
Course section pages make it easy to email your roster
You can view your student roster, updated in real-time from Workday, and email them easily with the click of a button.
What aren't they?
Course section pages are NOT the official record
Workday is the academic system of record. Your Portal course section pages merely display data like the student roster, section description, available seats, and meeting patterns.
Changes to this information should be facilitated in Workday. Workday is also where you must enter student grades and upload information/pricing on required materials.
See Workday Resources for Faculty for detailed instructions.
Course section pages are NOT learning management systems
Course section pages can link to an LMS like Moodle or Google Classroom and can host a limited set of resources, but you cannot build session-based content, post assignments, or solicit student comments from Portal (nor should you try to).
Page visibility
The information that displays on your Portal course section page(s) differs by viewer:
|
Role |
Edit Content |
View Linked Content |
View Roster |
Email Roster |
View Course Catalog Information (Title, Description) |
|---|---|---|---|---|---|
|
Instructor |
Yes |
Yes |
Yes |
Yes |
Yes |
|
Co-instructor |
Yes |
Yes |
Yes |
Yes |
Yes |
|
Registered Student |
No |
Yes |
Yes |
No |
Yes |
|
All other students, faculty, staff,* and guest users |
No |
No |
No |
No |
Yes |
*Excepting Portal site administrators.
How to get to your course section page(s)
The easiest way to find your course section pages is from your Home Dashboard in Portal:
When logged in to the Portal, you'll see a My Classes widget in the right-hand sidebar, which lists your scheduled course sections for the current and/or upcoming term. Each section title links to its Portal course section page!

Course section page features
Read more below about each of the features available on your Portal course section page(s).

Data from Workday
A good chunk of the information that displays on your course section page comes from Workday. Things like the course title, campus location, meeting patterns, available seats, and section description all come from Workday, as do the instructor assignments.
Or, to keep it simple, everything with a gray background comes from Workday!
In addition to this information, the student roster also comes from Workday and updates in real-time. Available seats also update in real-time, while all other Workday information only updates overnight.
Enable editing
In order to customize your course section page, you’ll first have to click the Edit button to reveal your available options.
You can click the Finish Editing button to hide editing tools and display uploaded content (as registered students would see it). Finish Editing is not actually a “save” function but merely toggles the display.
Emailing your class
Click the Send email to class button beneath the student roster on your Portal course section page to draft an email to your class. Your default email client will open a new message with your students’ CCA emails in the BCC line.
To set email links to open in a different/preferred email client, read these instructions on how to set your default email reader to Gmail.
Add a Virtual Meeting
Portal lets you define a virtual meeting, like a recurring class Zoom call, so it's easy for your students to find. Enter a title for your virtual meeting and then paste the URL in. Finish Editing when you're done. The virtual meeting link will display both on the course section page and the My Classes widget.
Creating a Google Classroom
You can create a new Google Classroom which will be populated with your currently enrolled students. Your students and co-instructors will be able to click this new link to get to their Classroom. The link appears on the course section page as well as the My Classes widget. The person who creates the Google Classroom will be the owner. Here are the steps:
- Visit the course section page and click the Edit button
- Under the Create Google Classroom heading, select Create Google Classroom
- Click the Refresh button to make your Google Classroom calendar appear on the page
- Clicking on the Refresh button also adds/drops students based upon updated Workday information. This also enrolls new co-instructors, but will not remove any manually added co-instructors.

Note: If you want to copy a previous semester's Classroom, you cannot use this function. You will need to go to classroom.google.com and copy a previous course from there. You can then return to your course section page and add the link to the Google Classroom in the Add Other Course Site URL section. Refer to the Google help documentation to learn more about copying a Classroom.
Note: Cross-listed or co-located sections have separate course section pages in Portal. Each page will only reflect that particular section’s enrollment. Therefore, creating a Google Classroom from your course section page will only include some of your students (those enrolled in that section). You will need to go to classroom.google.com to manually add the other students in the other section(s).
CAUTION: Do not click the Refresh button if you have added students manually, as they will be removed. If you need to click the Refresh button to force your Google Classroom Calendar to appear on your course section page, do this before adding your additional students.
Linking to a Moodle course
You can link to your Moodle course for your section. The link will appear on the course section page as well as the My Classes widget.
- Visit the course section page and click the Edit button
- Under the Class Sites heading, click Add Moodle Course Site
- The link to your Moodle course will now display
Note: If your section is cross-listed or co-located, those sections are already joined in Moodle, so your link includes all students.
Note: if the Add Moodle Course Site button is grayed out then your course does not yet have a Moodle site created. Sites are created automatically once a course is published, so you should be able to wait a day or two, then return to click the Moodle course site button.
Add other course site URLs
If you have another website or tool that is being used for your class, you can add a link to it here by clicking on the Add Other Course Site URL button. The link(s) will appear on the course section page as well as the My Classes widget. You can add up to three additional course sites.
- Visit the course section page and click the Edit button
- Under the Add Other Course Site URL heading, click Add Other Course Site URL
- Enter a title for your course site and add the URL
- Click Save and the Moodle link will display
Uploading your syllabus
Course section pages will allow you to add a syllabus that's visible to your students but also stored in the VAULT digital archive. Here is an animation showing the steps written below:
- Visit the course section page and use its Edit button
- Under the Syllabus heading, select Upload Syllabus
- Use the Choose File button to locate the PDF syllabus on your computer
- Select the Upload Syllabus button to complete the upload
Note: You must repeat this process once for each of your sections. Course section page features are not copied to co-located sections, so you may need to duplicate these features on multiple pages.
You and your co-instructor are both able to view the syllabus in Portal and in VAULT. Your students will only see the copy on the Portal. You can replace a syllabus by selecting the page's Edit button and then Replace Syllabus, following the same set of steps above. If you want to see the older, replaced versions of your syllabi, you can go to Manage Resources > Archive in VAULT.
Adding additional links and documents
You can make several other resources available from your course section pages as well. Link to other websites and online tools using the Add Link feature, or upload PDFs of relevant readings or files using the Add Document feature.
You can add up to 10 resource links. There is no limit on PDF uploads.

Add Link
- Visit the course section page and use its Edit button
- Under the Links heading, select Add Link
- Enter a title for your resource and add the URL
- Click Save and the newly added link will display
Add Document
- Visit the course section page and use its Edit button
- Under the Documents heading, select Add Document
- Click Choose File and select a (5 mb or less) PDF file to upload from your computer
- Enter a title for your resource
- Click Save and the newly added document link will display

Note: Your web links and document links will remain separated in display. Within each of these sections, items will display in alphabetical order by title. If you want to control the order of your links, number them 01, 02, 03, etc.
Edit/Delete Link
- From your course section page, click the Edit button
- Click the pencil icon next to any web link (under the Links heading) to pull up editing options
- Change the link label and/or URL as needed.
- Click Save to retain changes
- To delete an item, click the trash icon next to the link

Edit/Delete Document
- From your course section page, click the Edit button
- Click the pencil icon next to any linked document (under the Documents heading) to pull up editing options
- Change the document link label as needed.
- You will not be able to swap uploaded files. If needed, delete the document, and uploaded a new one with the proper PDF file.
- Click Save to retain changes
- To delete an item, click the trash icon next to the document link
Note: Save or cancel out of any edits to individual link or document fields before clicking the Finish Editing button. If an Add Link or Add Document window is still open when you click Finish Editing, you may experience abnormal editing functionality with that field. You can resolve this by refreshing the page.
Calendar
Course section pages allow you to display a Google Calendar for your class. Your calendar must be marked "public" in order for you to do this. We advise that you create a calendar for each class rather than reuse your personal calendar since all your events will be shown on the Portal. To add a calendar:
- Locate your Google Calendar ID
- Go to Google Calendar
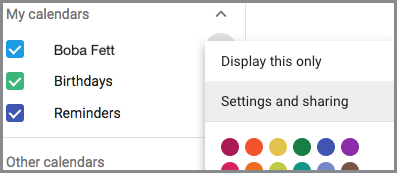
- Find the calendar in the list on the left, click the vertical ellipsis "⋮" (three dots) next to its name
- Select "Settings and sharing" from the menu
- If you're not certain your calendar is public, you can make it so here by selecting Make available to public under the "Access permissions" section
- Scroll down to "Integrate calendar" and copy the Calendar ID which will look like "[email protected]"
- Visit the course section page and use its Edit button
- Under the Calendar section, select Add Calendar
- Paste in the Calendar ID from step #1, then select Save Changes

You do not need to redo these steps if you add events to your calendar later; they automatically appear on Portal in the weekly calendar view.
Note: If you create a Google Classroom using the button on the course section page, the Classroom calendar will replace any other calendar you've added. You will need to select the Refresh button beside Google Classroom to make the Classroom calendar appear on your page.
Frequently asked questions
Why am I seeing red exclamation points next to my courses?
The exclamation marks are warnings regarding two things. First of all, Portal is prompting you to define a Class Site URL for your course. The easiest way to do this is to teach with Moodle and select the Add Moodle Course Site button while editing your course section page.
The second warning occurs when your Moodle site is hidden. Initially, all Moodle courses are hidden in order to give you time to build your course before students interact with it. But if you link to your Moodle course from Portal while the course is hidden, the link will not work for students. So this warning reminds you to make your course visible so students can view it. To make a course visible:
- Go to the course in Moodle (you can click the Moodle link from the My Classes list on the Portal dashboard)
- Select the Settings tab
- Under the first section, change Course visibility from Hide to Show
- Use either of the blue Save buttons at the bottom of the form
I made my Moodle course visible; why am I still seeing a red exclamation point?
Portal refreshes it's data from Moodle hourly, so it takes time before it notices that your course is visible. If you have made your Moodle course visible—and hopefully linked it from your course section page, too!—then you've done the right thing and the warnings can be ignored. If you want to confirm that everything is right, you can wait an hour to check if the warning goes away.
Why do I see warnings if I'm using Google Classroom or an "Other Course Site URL"?
Portal will still show the warnings about a hidden Moodle course and lack of a Moodle link even if you're using a different learning platform, such as Google Classroom. You can simply ignore the warnings if this is the case.
What if I don't have a PDF copy of my syllabus?
Almost any file format can be converted to a PDF with ease. Here are the methods for a couple of common document formats:
- Microsoft Word: look for a way to print or save the document as a PDF. Commonly, you will be able to go File > Save As > select PDF from the list of file formats. You can also try File > Print > Destination: Save as PDF.
- Google Docs: go to File > Download > PDF Document (.pdf).
- Pages: go to File > Export To > PDF. You can also print to PDF in the same manner as Microsoft Word.
If your syllabus is dynamic such that it does not translate to PDF perfectly—for instance, if it's a website or if it utilizes 3D or 4D media—please create a PDF version for us to archive (e.g. by using print to PDF), but also we recommend to add a link to your original under your course section page's Resources.
What happens to the replaced copy of my syllabus?
If you replace a syllabus, the old copy is put into an "archived" state in VAULT where it is still accessible to you but will not show up in VAULT's browsing folders nor search results. If you need to access your replaced copy, you can find it in VAULT by visiting My Resources and then Archive. The original file will be available to view or download.
Why isn’t my Google Classroom calendar appearing?
After you create a Google Classroom using that feature, you need to go back to Edit your course section page and select the Refresh icon beside Google Classroom. Only after you’ve refreshed for the first time will the Google Classroom calendar appear. This is due to a limitation with Google’s services and we are looking into ways to eliminate this extra step.
What do I do if I don't have a Moodle site?
If there is not a corresponding Moodle site for your course section page, you will be unable to click the link and a red alert icon will display next to the Add Moodle Course Site button. It will prompt you to contact the Help Desk for assistance.
Why does a student on my roster lack a profile link?
Student names in your course section page roster link by default to each student’s Portal profile. You may notice, however, that some student names are not linked. These students have opted out of inclusion in the Portal directory.
These students’ names are still visible to instructors and registered students, and their emails will still be included when using the Send email to class button.
What do I do if I want to reorder content?
By default, links added to the Resources section will display in alphabetical order (top to bottom). If you wish to order resources differently, you can do so by adjusting link naming conventions.
For example, you can “number” each link using the Name field to dictate order:
1 - Introduction to the World of Microcontrollers
2 - Fundamentals of Programming for Arduino
3 - A Beginner’s Guide to Using Haptic Sensors