Submit Grades Step by Step Guide
PLEASE NOTE: You will be able to follow along with the instructions below during periods when interim or final grading are open. If grading is not open, you will not have access to locate the Interim Grade Roster or Grade Roster features. You will receive an email from Student Records to alert you when grading periods are active.
Workday Grading Video Guide
1. Access the Workday Teaching Dashboard
a. Go to workday.cca.edu, and log in using your CCA Account credentials.
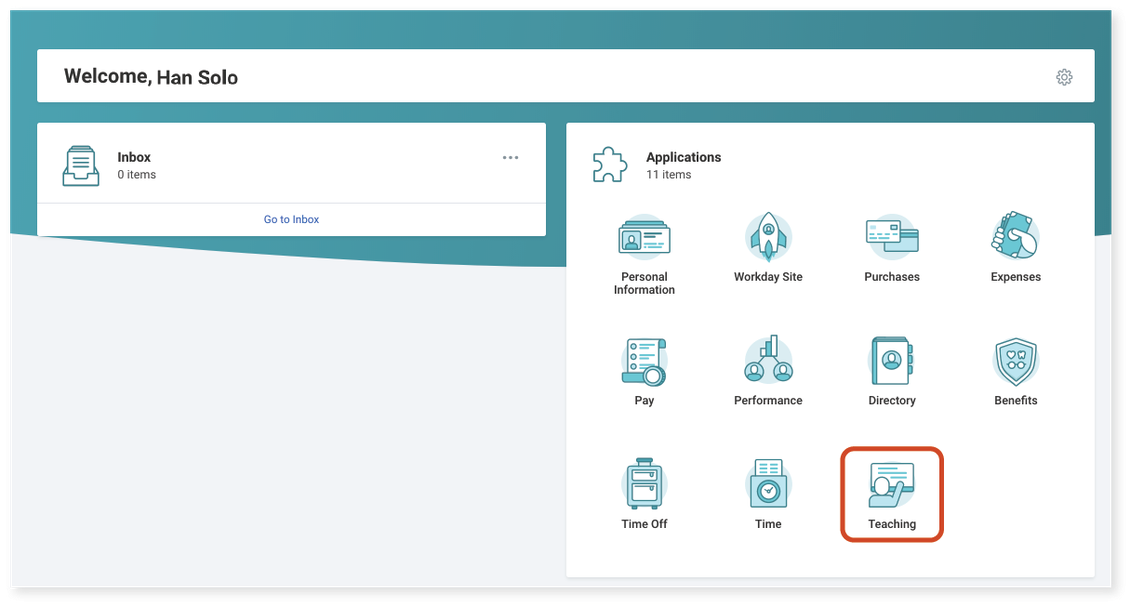
b. Under Applications, click Teaching CCA to access your Teaching Dashboard.
2. Access Grading Tools
a. In the My Teaching Schedule + Roster Step by Step Guide, we covered how Related Actions (the Twinkie icon) can help you access roster info and grading tools.
Here are four places you'll find course grading tools from Related Actions:
|
Report/Worklet |
Where to Find Grading Tools |
|---|---|
|
View Teaching Schedule |
"Related Actions" on links in the "Course Section" column |
|
My Teaching Assignments |
"Related Actions" on links in the "Section" column |
|
My Students by Course - Current and Upcoming |
"Related Actions" on links in the "Course Section" column |
|
Student Rosters for Current/Upcoming/Past Courses |
"Related Actions" on the magnifying glass icon in the "Section Actions" column |
Now, let's recap how Related Actions work.
b. Hover over the course section link, but do not click it.
c. Click the Related Actions button (three dots bounded by a box, to the right of the course section, and reminiscent of a Twinkie).
d. In the left-hand side of the resulting popup menu, hover over Course Section Definitions, but do not click it.
e. Click Grade Roster or Interim Grade Roster, depending on what you would like to do. If you need to change grades you have already submitted, click either Grade Roster or View Roster.
- Grading functions will only be available during a certain timeframe.

- For assigning interim (midterm) grades, click Interim Grade Roster, then proceed to step 3.
- For assigning final grades, click Grade Roster, then proceed to step 4.
- For changing submitted grades, click Grade Roster or View Roster and proceed to step 5.
3. Assign Interim Grades
**Please note that summer instructors do not submit interim grades.**
To access the interim grading screen, follow the steps given above.
The interim grade screen shows a table listing registered students in separate rows.
a. To add a concern (an interim grade), click the corresponding plus icon (between the Academic Level and Interim Grade columns) for a student in the list.
- A new row will appear directly below, including a blank field in the Interim Grade column. Click the blank field and select the appropriate concern from the list. Only interim grade options are available for selection.
- If you want to apply more than one concern to a student, create a new row by repeating step 3a above.
b. A Grade Notes field becomes available after assigning an interim grade/concern for a student. This is an optional space for providing details about your concern and/or how you have attempted to address it with the student, whether they have been responsive, etc..
- Notes will help staff who may reach out to the student if appropriate.
- Students will see any Grade Notes you have added.
c. Interim Grade Date defaults to the current date.

d. Repeat for each student who needs an interim grade.
- If you want to finish grading later, you can return to this screen anytime during the interim grading window.
e. Click OK to save changes, then click Done to exit the task.
- Interim grades are visible to students immediately. Students will receive email notification of an IPR within 24 hours of an instructor filing one.
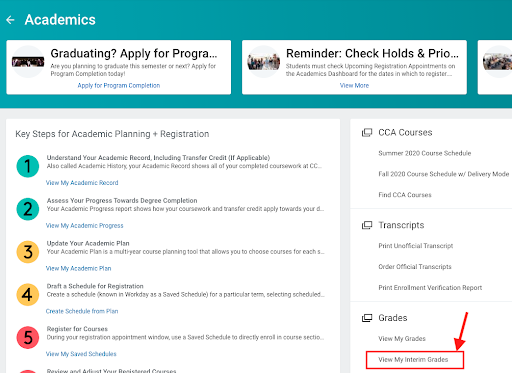
- Students can access their IPR (aka Interim Grades) from their Academics dashboard by selecting “View My Interim Grades” in the right-hand column, under the section “Grades.”
- You can view assigned interim grades at a later time:
- Within the Student Rosters for Current Courses report (or the Student Rosters for Past Courses report if the term has ended), look for the Last Interim Grade column on the right of the table.
- Within the My Students by Course - Current and Upcoming worklet, click the blue number in the Enrollments column. In the resulting popup, look for the Last Interim Grade column on the right of the table.
4. Assign Final Grades
**Instructors must submit final grades within one week after their class ends.**
The final grade screen shows a table listing registered students in separate rows.
a. Click the Final Grade dropdown for a student you would like to grade, and select the appropriate grade from the resulting list.
- All grade options are available to choose here, but please only select appropriate grade types.
- Typically, classes utilize letter grades A through F or I (incomplete) for final grade assignments.
- Internship, COMIC, FINAR, WRITE, and Summer Start classes are graded on a Pass / No Credit basis instead.

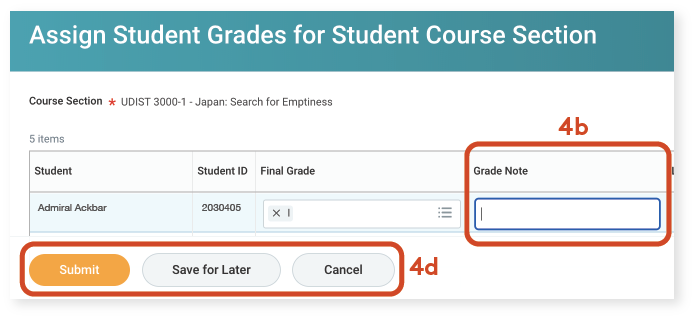
b. If you assign a grade of incomplete (I ), a blank text field will appear in the Grade Note column.
- Click the Grade Note field, and type a brief reason for the grade.
- This is a requirement for submitting incomplete grades.
- The Grade Note field will also be available for optional comments when assigning a failing grade (F).
c. Repeat for each student.
- You can return to this screen if you want to finish grading later (see next step for detailed instructions).
d. When you are finished making changes:
- Click Submit to have any entered grades Posted.
- Follow step 5 below for instruction on changing posted grades.
- Click Save for Later to retain any entered grades without posting them.
- Click Cancel to discard any new changes.
- Posted grades will not be affected.
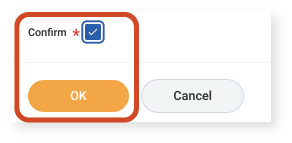
You will need to confirm submitted grades before exiting the grading workflow. Do not skip the step below!
e. If you click Submit, review information on the following screen, check the Confirm box, then click OK.
- Submissions are routed to Student Records for approval.
5. Change Assigned Grades
You may need to change a student's grade after it is posted (both submitted and approved). This follows a slightly different process than changing interim or draft/pending grades.
- Note that grade change functionality may be limited by when a course section was taught, as changes for sections taught in the distant past may follow a different process.
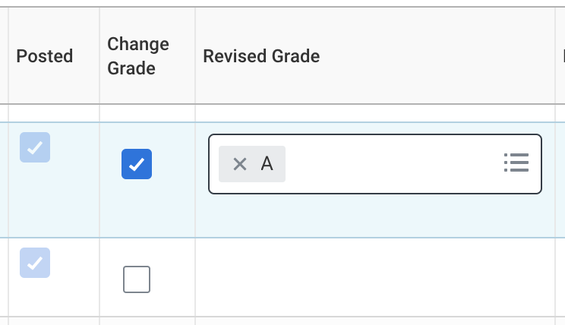
a. For any student with a Posted grade, you should see a Change Grade checkbox in the adjacent table column. Check this box for the student whose grade you want to change.
b. Select the grade the student should receive from the Revised Grade dropdown menu.
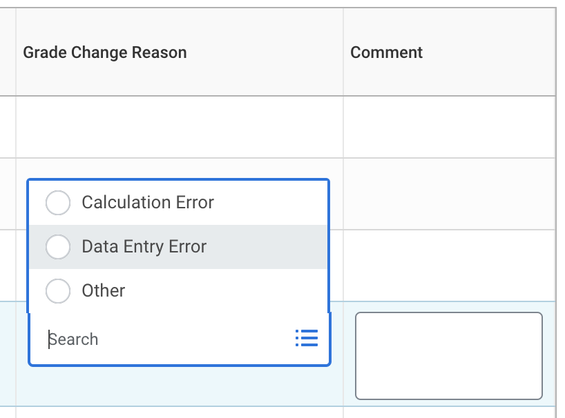
c. Select one of the following Grade Change Reasons (you may have to scroll right to see this table column):
- Calculation Error - Mistake in offline/external calculations of the student's grade.
- Data Entry Error - Mistake in selecting the appropriate student grade in Workday.
- Other - Anything else.
- When selecting Other, you must also provide a brief explanation in the Comment field.
d. Click Submit to save and submit the grade changes.
- Submitted changes will require processing before they are posted in Workday.
- Pending grade changes will appear in the Final Grade column of the Assign Final Grades screen. Pending grade changes will appear as In Progress and will not be Posted.


