Gradebook Setup - Weighted Mean of Grades
Jump to a section:
Before you begin
IMPORTANT: This page is specifically for setting up a Moodle course gradebook that uses the Weighted Mean of Grades course grade aggregation method. Before taking any further steps, please first create your course grade breakdown and select a matching grade aggregation method. If your course grade breakdown matches the Natural aggregation method instead of Weighted Mean of Grades, please visit the Gradebook Setup - Natural page.
To use the Weighted Mean of Grades grade aggregation, your course grade breakdown should look similar to the example course grade structure below. In the example below, the relative value or significance of a grade item is determined not by its maximum points, but by adjusted percentages or weights in comparison to other grade items. For example, in the table below, class participation counts for 20% of the final grade, and within this category, attendance and participation carry equal weight (1:1).
|
Course Total Grade |
100 |
|---|---|
|
Category: Assignments |
50% |
|
30% |
|
30% |
|
40% |
|
Category: Class Participation |
20% |
|
50% |
|
50% |
|
Category: Quizzes |
30% |
|
40% |
|
60% |
Using the course grade breakdown table above as an example, to set up a Weighted Mean of Grades course gradebook, please follow the steps below.
Set up course grade aggregation
First, you will need to select Weighted Mean of Grades as the course-level grade aggregation method. Please visit the Set up Moodle Course Grade Aggregation how-to guide.
Create Grade Categories and assign category weights
Grades in Moodle Gradebook can be organized into categories. If a course utilizes the Natural aggregation method, grade categories are not necessary. However, when using the Weighted Mean of Grades aggregation, grade categories should be created.
Moodle Gradebook categories represent the categories or groupings in your course grade breakdown. To create a grade category,
- Navigate to Grades > Gradebook setup, and then Add Category.

- On the details page, insert the name of the category and choose Weighted Mean of Grades or another aggregation method for this category. In most cases, you can leave the other fields and settings as the default, and Save Changes.
- Repeat the steps above to create the other categories you need for the course. For example, in the following screenshot, three categories have been created, including Assignments, Class Participation, and Quizzes.
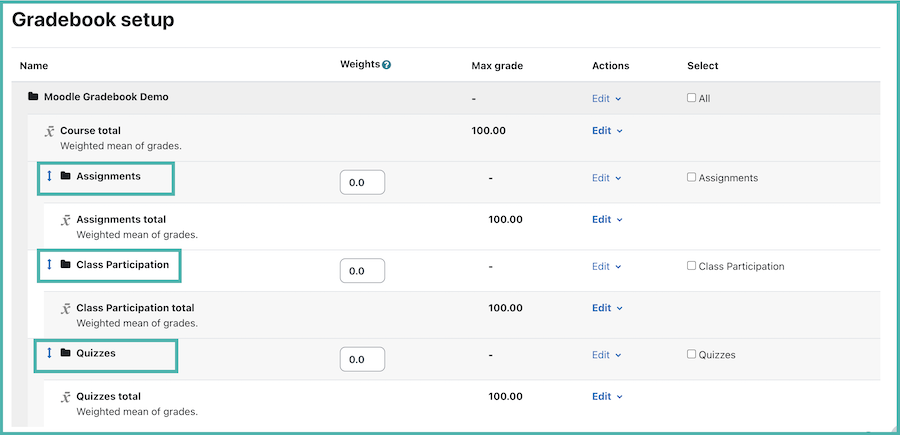
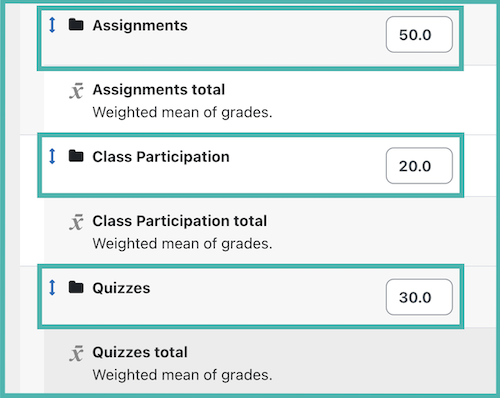
- Assign weights. Once categories are created, you will need to assign weights to them to match their corresponding categorical percentages as planned in the course grading breakdown. To assign weights, click the box in the Weights column to the right of the category, insert the weights, and click Save changes at the bottom of the page. For example, the following three categories occupy 50%, 20%, and 30% of the overall course grade respectively. Therefore, their weights should be 50, 20, and 30 (or 5, 2, and 3) each.
Move grade items into their corresponding categories
Once you have set up the course grade aggregation and created the grade categories as needed, you can start creating assignments and/or other activities such as quizzes and forums. Grade activities should be placed in their corresponding grade categories. In general, there are two ways to make sure that a grade activity is in its matching category.
1. When you create an activity, , in the activity Settings, under Grade, you can select the desired grade category that the grade activity or item should be placed under. This way, the grade activity will be automatically added to its matching grade category in the course gradebook.
Or,
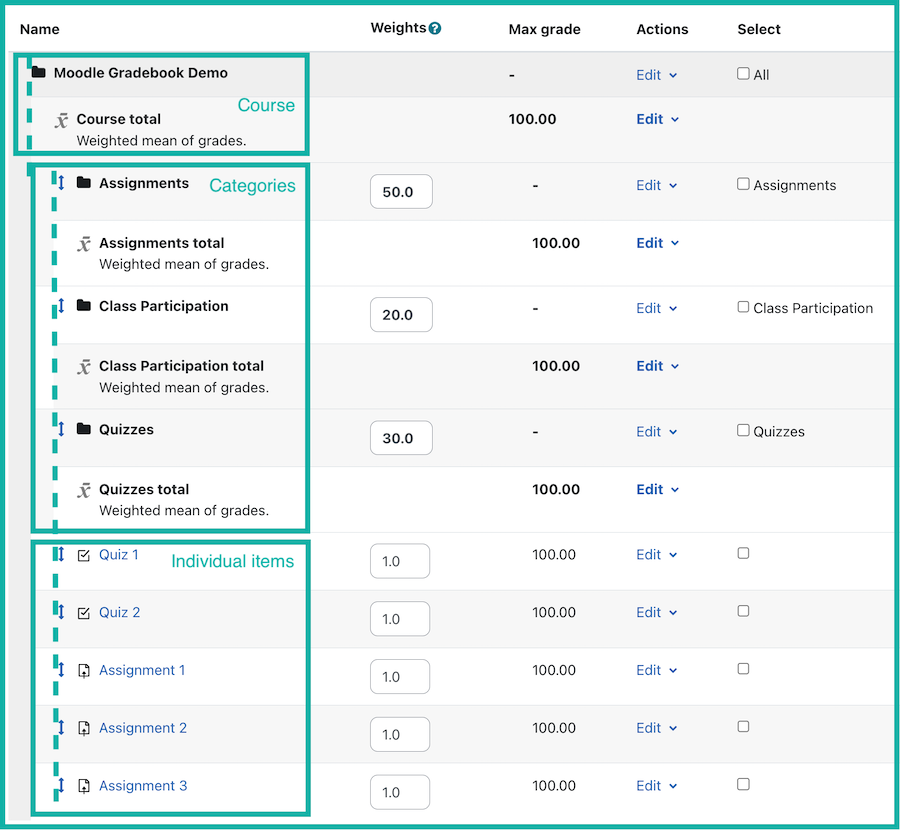
2. If your grade activities have already been created where grade categories were not specified, you can move them to their matching categories by going to Grades and then Gradebook setup. On the Gradebook setup page, you will see that Moodle gadebook uses folder icons and indents to create a visual hierarchy. For example, in the screenshot below, you see that the course folder/category is at the highest level, and it houses the subordinate grade categories, including Assignments, Class Participation, and Quizzes. The individual grade items, such as assignment 1 and quiz 1 are at the same level as the grade categories because they are not placed under their matching categories yet.
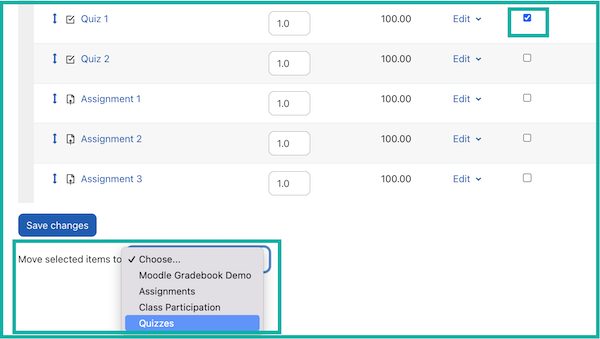
To move individual grade items to a category, for example, quiz 1, you will select the item(s) by checking the box to the right of it, go to the bottom of the page and use the drop-down menu to select the target category. Note that your browser might show you a window asking if you wish to leave the window, choose yes and the page should refresh itself, after which you should see that the item has been moved under the target category. You can also tell the move was successful because of the new visual hierarchy where the grade item is now indented (see the second screenshot below).

Add a Grade Item Manually as Needed
The steps above apply to cases where instructors create Moodle activities in their courses and set up grading for them so they count for the overall course grade, such as a graded assignment activity or a graded quiz activity created in Moodle using the Add an activity or resource window.
However, sometimes, a grade item is needed in the calculation but doesn't necessarily have a corresponding Moodle activity, such as graded events hosted in person instead of in Moodle or a general participation grade based on observations. For this type of grade items where there is no corresponding Moodle activity in the Moodle course, instructors can create a grade item manually in the course gradebook, which allows them to document grades and have them calculated as planned. Please read the Adding a Grade Item Manually page for more details.
Assign grade item weights
Following the steps above, you should have assigned weights to the grade categories so the weights add up to 100 and reflect the relatively importance of the grade categories. Now you will also assign weights to the individual grade items.
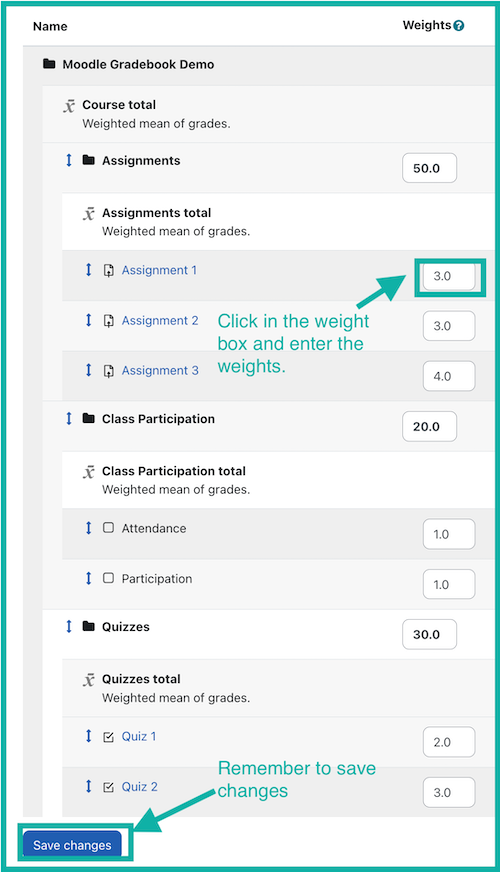
For example, in the grade table at the top of this page, within the Assignments category, as the items' planned percentages or weights suggest, Assignment 1 : Assignment 2: Assignment 3 = 30:30:40 = 3:3:4. Similarly, in the Class participation category, each of the grade items occupies 50% of the categorical weight, thus their weights are are 1 and 1 (50%:50%).
To assign the weights, as shown below, click into the weight box next to the target grade item and enter the weights. Go to the bottom of the page to save changes. Repeat these steps to assign weights to all grade items.
Set a Grade Item as Extra Credits
There is no direct way to setting a grade item in a Weighted Mean of Grades gradebook to be an extra-credit item. Instead, you should set the weight for the grade item to "0" so it won't hurt the grades of those who choose not to do the extra credit assignment or project. For those who do choose to complete an extra-credit assignment, you can manually add the extra credits to their course final grades at the end of the semester when you are ready to submit their official grades in Workday.
It is strongly recommended that you reach out to Help Desk to schedule a gradebook consultation with the Instructional Services and Technology (InST) team if you have any questions about setting up an extra-credit item.
If your planned course grade breakdown looks very different from the example table at the top of this page, e.g., the significance of a grade item is not represented by its relative percentage or weight, but by a specific maximum point value, you may consider visiting the Gradebook setup - Natural page instead.
To ensure that your gradebook setup aligns with your planned course grade breakdown, you are welcome to reach out to Help Desk to schedule a gradebook consultation with the Instructional Services and Technology (InST) team.
